Saturday, January 29, 2011

Backpack and Crayon roll up

I can't believe my little Willow is starting preschool next week! *sniff sniff* So a few days ago I made her a backpack and crayon roll up. She is so excited, and to be honest I'm a little excited too, haha. Enjoy the pics!

the fabric was left over from a dress I made for my friend Nikita's little girl.
Here is a pic of the dress with the back pack. too cute!
This is a pic of the flap on the backpack

And a pic of the inside of the crayon roll up.
Thanks for looking -Leah

Friday, January 28, 2011

Mama Mia Purse

Mama Mia Purse


Hey everyone! This purse is so chic! The pattern is called "Mama Mia", by Favorite Things Pattern Design. The fabric is by Michael Miller, Damask collection. This is for my husbands friend's wife, Sarah.
She picked out the fabric and it looks amazing! I am in love with this fabric. The pattern is actually a diaper bag. It comes with instructions for a changing pad also. Definately worth the $10 for the pattern. This is the second one I've made and I am so pleased with the way they have turned out.


Here is the same pattern in a different fabric.

Thanks for looking! -Leah

Tuesday, January 25, 2011

Personalized bib and burp cloth sets

Hey everybody! Sorry i haven't posted anything in a few days, i had surgery a few days ago and have been recouperating (as much as you can recoup with 3 kids bouncing off the walls)
 I thought that I would enjoy the time off but after about 2 days I was ready to get back to normal, so i've been sneaking at night and working on some of my " to do " projects. Here are some bibs and burp cloths i finished this week.  Enjoy!
Thank you all for looking! I will post some new tutorials later on this week so check back!- Leah

Cute ear warmers

I found this tutorial at www.prudentbaby.com/2010/12/adorable-diy-ear-warmers.html  these are so cute!

I made this one, but my sister stole it from me. :0)
So I had to make another one.

Check out her tutorial, it is super easy and super cute!

Thanks for looking! -Leah

Thursday, January 20, 2011

Pretty Tunic


I thought the little dresses were so cute, so i thought why not make myself one.
This could be a dress, but my legs have not seen the light of day in quite some time...so I'm gonna go with tunic. :0)
This is a size 10 tunic made with Amy Butler "daisy chain" fabric.
I used one of my favorite fitting tops as a template for the bodice.
This uses about a yd of the main fabric and 1/2 yd for the coordinating fabric.

Big Sis / Little Sis Dresses


These little dresses i made for my sister's sister-in law's beautiful daughters, Caroline and Audrey. I know they will look adorable in them... but they could make potato sacks look good.


 Above: sz. 9 month
 Right: sz. 3T

Fabric: "dance with me kimberly" pink/lime 
Bodice fabric: "dance with me leann"

Tuesday, January 18, 2011

True Beauty

Real Beauty

Running around the house today, picking up toys, doing laundry, and cleaning hand prints off the windows, i caught a glimpse of myself in a mirror and thought, "wow girl, you need to get it together". i haven’t had a shower in 3 days, i don’t have a stitch of make-up on, and realizing that that smell that has been following me around all day might actually be me! I've come to that time in mommy hood that you realize you are no longer the person you used to be. not only that but you don’t even resemble the person you used to be. I would have never left the house without a shower and makeup on, now i go to church some Sundays with neither. I remember lazy days with my husband when all we did was sit around and stare at each other and tell each other how much we loved each other, he would tell me how beautiful i was and I actually believed him. Now I'm stressed out and tired all the time. I got to thinking last night as I crawled into bed looking over to shane in the dark and thinking " what does he think about me" just then he said, "you are so beautiful". I said , "the lights are off, you can't even see me" he said " I don't have to see you to know that you are beautiful." Wow! how in the world could he still think that after the above description of myself. He knows everything about me and still says that after 6 years! i am starting to see that my beauty has little to do with what i look like and more to do with how I treat my husband and being the best mommy I can be to my kids, and most importantly giving God all of the insecurities that are holding me back from being those things. The Lord says he will give you beauty for your ashes (Is. 61:3), or in my case for my greasy hair, dimply butt, and the same pajama pants that i have been wearing for the last 4 days! How awesome that we serve a God that trades all of our trash for his best! So be encouraged mammas, you have so much more to offer other than external beauty, Proverbs 31:30 says " Charm is deceptive, and beauty is fleeting; but a woman who fears the LORD is to be praised". So go forth and be beautiful!!!

Leah

Monday, January 17, 2011

My First tutorial!

Pajama Pants and matching appliqued top


This is my handsome boy, Canaan, modeling pajama pants and a matching appliqued top. This is my first tutorial so let me know if anything is unclear.

Materials:
1/2 yd of main fabric
1/8 yd of coordinating fabric
1 yd of ribbon
matching thread
plain white t-shirt
lightweight interfacing

Instructions for Pajama Pants:
Step 1:
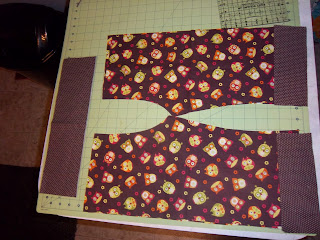
Use the pants as a template by folding them in half and cutting 1/2 in around the edges.
Cut 2 with the crotch facing left and 2 with the crotch facing right. This is automatically done by just doubling fabric while cutting.

leave it a little short at the end so we can add our coordinating trim.
cut 4 of these
Step 2:
cut coordinating fabric for trim and casing for our ribbon

 Cut 4 rectangles equal length as the bottom edge of pants and about 3 inches in width.

Cut 2 rectangles for the casing by overlapping two panels of the pants together until the middle seams meet,then cut coordinationg fabric the length of the two panels put together and about 4 inches in width.

Step 3:
Ironing the pieces that have been cut
Iron over 1/4 in on all 4 trim pieces

then fold over again 1/4 in to hide the selvege edge.

 For the long casing pieces. Fold and iron 1/4 in on both sides, we will use this as a sewing guide to make it easier, then fold the entire piece in half length ways.

Step 4:
Gather your things and lets sew!
take one pant leg and one trim piece, place them right sides together and sew a 1/4 in seam
then either serge the seams or do a zig zag stitch
Do this on all 4 pieces. Iron the seam.
Then sew the bottom fold down with a 1/4 in seam.

Step 5:
Place 2 opposite pant pieces, right sides together and sew just the crotch seam with a 1/4 in seam.

Zig Zag stitch the selvege edge.
Repeat with the other pieces.

Step 6:
Place the panels right side together, pin, and sew down both sides of pant legs and the inside of pant legs with a 1/4 in seam .
Zig zag stitch the selvege edge.


turn pants right side out and iron.

Step 6:
Unfold casing pieces. pin right sides together and sew on both ends with a 1/4 in seam.
Pin right side of casing to inside (wrong side) of pants. Sew together with a 1/4 in seam.

(optional) zig zag stitch the seam.

Step 7
add button holes for our ribbon to enter and exit. Follow your instructions that came with your sewing machine for sewing button holes.
Mark on the part of casing that will be facing forward, where you want your buttonholes placed.


cut down the middle of both holes using a seam ripper (make sure not to cut the thread)

you can use Fray Check or hold a flame over the threads for a few seconds, for stray threads

Step 7:
Fold the casing over, pin and sew close to the edge.


Step 8:

fold ribbon over twice and sew


place a saftey pin on the end of your ribbon and fish through to the other opening.

Yay! We are done!
how cute!
Appliqued t-shirt

step 1:
 using the same fabric we used on the pants and a lightweight interfacing cut a circle and the letter of your childs name.


Iron on the interfacing on the back of cut outs and on the inside of the t-shirt where you plan to place the applique.

Step 2:

Pin and sew onto shirt. I used a zig zag stitch on the bottom circle and a straight stitch on the letter. But be creative.


carefully remove the interfacing on the inside of shirt.
And your done!

please let me know if this was helpful! thanks for looking
Leah